
A clean garage door does more than look good. Dirt, salt spray, pollen, mildew, and road grime can shorten the life of paint, attack metal edges, and make weather seals crack early. In Seattle’s damp climate, a smart cleaning routine protects finishes, prevents rust, and keeps the door moving smoothly. Use this complete guide to choose the right products, avoid damage, and finish with a door that looks new again.
Supplies you will need
-
Garden hose with adjustable nozzle
-
Two buckets for the two-bucket method
-
Mild car wash soap or exterior house wash soap
-
Soft microfiber wash mitts and drying towels
-
Soft nylon detailing brush and old toothbrush
-
Non-scratch sponge and magic eraser for marks
-
White vinegar and water mix in a spray bottle
-
Oxygenated mildew remover for tough organic stains
-
Rust inhibitor primer or touch-up paint for small chips
-
Plastic sheeting or painter’s tape to protect seals and hardware
-
Optional: leaf blower for fast drying, low-pressure washer used carefully
Tip: Work in the shade on a cool day so soap does not dry on the surface.
Prep and safety checks
-
Close the door and pull vehicles away from the spray zone.
-
Cover keypads, photo-eyes, and the opener outlet with plastic if they are directly exposed.
-
Check for flaking paint, bare metal, or cracked caulk at seams. Make a note to touch up after washing.
-
If you see obvious rust spots, plan a targeted repair once the door is clean. When you are ready, follow this step by step resource on how to remove rust from a garage door.
Rinse to remove loose grit
Start at the top panel and rinse downward with a gentle fan spray. Push dirt off the surface instead of blasting it into joints. Rinse the perimeter trim and the bottom seal where gravel and sand collect.
Pressure washer guidance: keep pressure modest, use a 25 degree tip, and stay at least 2 feet from the surface to avoid forcing water behind panels or scarring paint.
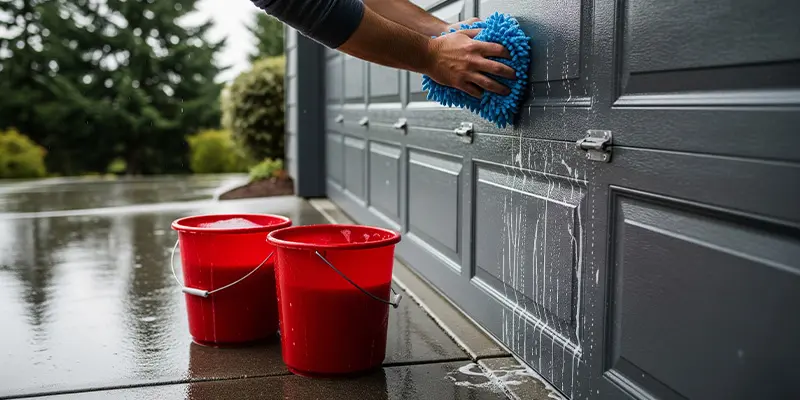
Two-bucket wash method
Fill one bucket with clean water and the other with soapy water. Soak the mitt in soap, wash a small section from top to bottom, then rinse the mitt in the clean water before reloading with soap. This keeps grit out of the mitt and prevents swirl marks.
-
Steel and aluminum doors: use mild car soap or exterior cleaner. Avoid harsh degreasers and abrasive powders.
-
Composite doors: use the same mild soap. Do not use solvent cleaners that can haze the surface.
-
Wood doors: use a wood-safe cleaner. Keep water exposure modest and wring out the mitt to avoid soaking the grain.
Work panel by panel, cleaning edges and recessed areas. Use a soft brush around hinge knuckles and decorative hardware.
Clean windows and frames
Spray a 50-50 mix of white vinegar and water on the glass. Wipe with a clean microfiber and finish with a second dry towel. For aluminum frames, use the same soapy water. Do not let cleaners drip into weather seals.
Detail the edges, tracks, and seals
-
Wipe the bottom seal and side weatherstripping with soapy water. Rinse gently and dry so they do not stick.
-
Use the toothbrush to lift grime from around hinge screws and between panel joints.
-
Lightly wipe the photo-eyes and brackets to remove dust. If you notice a persistent yellow light or alignment issues after cleaning near the sensors, this guide can help diagnose the problem: garage door sensor light yellow.
Target tough stains without harming finishes
-
Black rubber marks or bike tire scuffs: a magic eraser with light pressure. Rinse afterward.
-
Tree sap and road tar: use a citrus-based adhesive remover on a microfiber. Test in a hidden spot first.
-
Hard water spots: mist with the vinegar mix, wait 2 minutes, then wipe clean.
-
Mildew: apply oxygenated mildew remover, wait per label, gently agitate, then rinse.
-
Grease drips near hinges: a bit of soapy water and a non-scratch sponge is usually enough.
Never use oven cleaner, strong acetone, or abrasive pads on painted metal or composite skins.
Rinse and dry
Rinse the entire door from top to bottom until the water runs clear. Dry immediately with clean microfiber towels to prevent spotting. A leaf blower speeds up the process around seams and hardware.
Protect the surface so it stays clean longer
-
Metal and composite doors: apply a polymer spray sealant or automotive spray wax. Two light coats are better than one heavy coat. This adds gloss, sheds water, and makes pollen release easier next time.
-
Wood doors: after the door is fully dry, inspect for bare spots and refresh the topcoat as needed with a compatible exterior clear or stain system.
-
Hardware: lightly wipe hinges and handles dry. Avoid getting wax on the weather seals.
Clean the area around the door
Sweep the threshold and driveway edge so grit does not splash onto the bottom panel during the next rain. If you notice daylight or wind at the sides, consider upgrading the perimeter seal to stop drafts and keep the bottom section cleaner. Our team handles complete Seattle garage door repair if you want professional help with seals or alignment.
After-wash inspection checklist
-
Touch up small paint chips with a rust-inhibiting primer and matching paint.
-
Check for loose hinge screws and snug them gently.
-
Confirm the bottom seal is soft and seats evenly. Replace if it is cracked or flattened.
-
Lift the door manually with the opener disconnected. It should stay halfway up without drifting. If not, the springs may need adjustment by a professional.
-
Verify photo-eyes face each other and the indicator lights are solid.
Seasonal cleaning schedule for Seattle
-
Early spring: remove winter road film and de-salt hardware. Refresh spray sealant.
-
Mid summer: quick wash to remove pollen and spider webs.
-
Early fall: deep clean and check seals before heavy rain returns.
-
Any time after construction or landscaping: rinse dust and grit right away so it does not grind into paint.
Special care by material
Painted steel
Use mild soap only. Repair chips fast so rust does not start. If the finish looks chalky, a light hand polish followed by sealant can revive gloss.
Aluminum and glass
Rinse often. Aluminum is corrosion resistant but can pit if salt sits on the surface. For glass, avoid ammonia near factory tints or low-E coatings.
Wood
Keep water exposure brief. Clean, dry, and reseal edges regularly, especially the bottom rail where splashback is constant.
Composite
Very low maintenance. Clean with soap and water and avoid harsh solvents. Finish with a gentle spray sealant to keep the surface slick.
Common mistakes to avoid
-
Using a narrow high pressure jet up close that lifts paint or forces water behind panels
-
Washing in direct sun which bakes soap on the surface
-
Letting harsh cleaners drip onto weather seals
-
Ignoring the bottom seal and side strips where most grime builds up
-
Skipping the dry step which leaves mineral spots that etch over time
Quick FAQ
Can I use dish soap
A few drops are fine, but high pH dish soaps can strip protective wax. Car wash soap is safer for painted metal.
What about bleach
Use oxygenated mildew remover instead of straight chlorine bleach, especially around landscaping and painted finishes.
Do I need to wax a garage door
You do not have to, but a polymer spray sealant or automotive spray wax keeps the door cleaner longer and adds water beading.
How often should I clean
Twice a year is a solid baseline in Seattle. More often if your home is near busy roads or salt air.
Should I lubricate after cleaning
Yes. Wipe overspray away first, then lubricate hinges and rollers with a silicone or garage-door specific product. If rollers are noisy or rough, consider an upgrade using this guide: how to replace garage door rollers.
Final thoughts
A careful wash routine protects finishes, prevents corrosion, and keeps your garage door looking fresh through Seattle’s rainy months. Choose gentle cleaners, use the two-bucket method, and finish with a protective seal. Combine cleaning with a quick visual inspection and you will catch small issues early while enjoying a door that looks great year round.